内核安全利用

目的

在 Linux 内核漏洞利用中,攻击者可能会有以下几个目的

  • 提权,即获取到 root 权限。
  • 泄露敏感信息。
  • DoS,即使得内核崩溃。

一般而言,攻击者的主要目的是提权。

Privilege Escalation

内核提权指的是普通用户可以获取到 root 用户的权限,访问原先受限的资源。这里从两种角度来考虑如何提权

  • 改变自身:通过改变自身进程的权限,使其具有 root 权限。
  • 改变别人:通过影响高权限进程的执行,使其完成我们想要的功能。

https://en.wikipedia.org/wiki/Privilege_escalation

Change Self

内核会通过进程的 task_struct 结构体中的 cred 指针来索引 cred 结构体,然后根据 cred 的内容来判断一个进程拥有的权限,如果 cred 结构体成员中的 uid-fsgid 都为 0,那一般就会认为进程具有 root 权限。

1
2
3
4
5
6
7
8
9
10
11
12
13
14
15
16
17
18
19
struct cred {
atomic_t usage;
#ifdef CONFIG_DEBUG_CREDENTIALS
atomic_t subscribers; /* number of processes subscribed */
void *put_addr;
unsigned magic;
#define CRED_MAGIC 0x43736564
#define CRED_MAGIC_DEAD 0x44656144
#endif
kuid_t uid; /* real UID of the task */
kgid_t gid; /* real GID of the task */
kuid_t suid; /* saved UID of the task */
kgid_t sgid; /* saved GID of the task */
kuid_t euid; /* effective UID of the task */
kgid_t egid; /* effective GID of the task */
kuid_t fsuid; /* UID for VFS ops */
kgid_t fsgid; /* GID for VFS ops */
...
}

因此,思路就比较直观了,我们可以通过以下方式来提权

  • 直接修改 cred 结构体的内容
  • 修改 task_struct 结构体中的 cred 指针指向一个满足要求的 cred

无论是哪一种方法,一般都分为两步:定位,修改。这就好比把大象放到冰箱里一样。

直接改 cred

定位具体位置

我们可以首先获取到 cred 的具体地址,然后修改 cred。

定位

定位 cred 的具体地址有很多种方法,这里根据是否直接定位分为以下两种

直接定位

cred 结构体的最前面记录了各种 id 信息,对于一个普通的进程而言,uid-fsgid 都是执行进程的用户的身份。因此我们可以通过扫描内存来定位 cred。

1
2
3
4
5
6
7
8
9
10
11
12
13
14
15
16
17
18
19
struct cred {
atomic_t usage;
#ifdef CONFIG_DEBUG_CREDENTIALS
atomic_t subscribers; /* number of processes subscribed */
void *put_addr;
unsigned magic;
#define CRED_MAGIC 0x43736564
#define CRED_MAGIC_DEAD 0x44656144
#endif
kuid_t uid; /* real UID of the task */
kgid_t gid; /* real GID of the task */
kuid_t suid; /* saved UID of the task */
kgid_t sgid; /* saved GID of the task */
kuid_t euid; /* effective UID of the task */
kgid_t egid; /* effective GID of the task */
kuid_t fsuid; /* UID for VFS ops */
kgid_t fsgid; /* GID for VFS ops */
...
}

在实际定位的过程中,我们可能会发现很多满足要求的 cred,这主要是因为 cred 结构体可能会被拷贝、释放。一个很直观的想法是在定位的过程中,利用 usage 不为 0 来筛除掉一些 cred,但仍然会发现一些 usage 为 0 的 cred。这是因为 cred 从 usage 为 0, 到释放有一定的时间。此外,cred 是使用 rcu 延迟释放的。

间接定位

task_struct

进程的 task_struct 结构体中会存放指向 cred 的指针,因此我们可以

  1. 定位当前进程 task_struct 结构体的地址
  2. 根据 cred 指针相对于 task_struct 结构体的偏移计算得出 cred 指针存储的地址
  3. 获取 cred 具体的地址

comm

comm 用来标记可执行文件的名字,位于进程的 task_struct 结构体中。我们可以发现 comm 其实在 cred 的正下方,所以我们也可以先定位 comm ,然后定位 cred 的地址。

1
2
3
4
5
6
7
8
9
10
11
12
13
14
15
16
17
18
19
20
21
22
23
24
    /* Process credentials: */

/* Tracer's credentials at attach: */
const struct cred __rcu *ptracer_cred;

/* Objective and real subjective task credentials (COW): */
const struct cred __rcu *real_cred;

/* Effective (overridable) subjective task credentials (COW): */
const struct cred __rcu *cred;

#ifdef CONFIG_KEYS
/* Cached requested key. */
struct key *cached_requested_key;
#endif

/*
* executable name, excluding path.
*
* - normally initialized setup_new_exec()
* - access it with [gs]et_task_comm()
* - lock it with task_lock()
*/
char comm[TASK_COMM_LEN];

然而,在进程名字并不特殊的情况下,内核中可能会有多个同样的字符串,这会影响搜索的正确性与效率。因此,我们可以使用 prctl 设置进程的 comm 为一个特殊的字符串,然后再开始定位 comm。

修改

在这种方法下,我们可以直接将 cred 中的 uid-fsgid 都修改为 0。当然修改的方式有很多种,比如说

  • 在我们具有任意地址读写后,可以直接修改 cred。
  • 在我们可以 ROP 执行代码后,可以利用 ROP gadget 修改 cred。
间接定位

虽然我们确实想要修改 cred 的内容,但是不一定非得知道 cred 的具体位置,我们只需要能够修改 cred 即可。

(已过时)UAF 使用同样堆块

如果我们在进程初始化时能控制 cred 结构体的位置,并且我们可以在初始化后修改该部分的内容,那么我们就可以很容易地达到提权的目的。这里给出一个典型的例子

  1. 申请一块与 cred 结构体大小一样的堆块
  2. 释放该堆块
  3. fork 出新进程,恰好使用刚刚释放的堆块
  4. 此时,修改 cred 结构体特定内存,从而提权

但是此种方法在较新版本内核中已不再可行,我们已无法直接分配到 cred_jar 中的 object,这是因为 cred_jar 在创建时设置了 SLAB_ACCOUNT 标记,在 CONFIG_MEMCG_KMEM=y 时(默认开启)cred_jar 不会再与相同大小的 kmalloc-192 进行合并

1
2
3
4
5
6
void __init cred_init(void)
{
/* allocate a slab in which we can store credentials */
cred_jar = kmem_cache_create("cred_jar", sizeof(struct cred), 0,
SLAB_HWCACHE_ALIGN|SLAB_PANIC|SLAB_ACCOUNT, NULL);
}

修改 cred 指针

定位具体位置
定位

直接定位

显然,cred 指针并没有什么非常特殊的地方,所以很难通过直接定位的方式定位到 cred 指针。

间接定位

task_struct

进程的 task_struct 结构体中会存放指向 cred 的指针,因此我们可以

  1. 定位当前进程 task_struct 结构体的地址
  2. 根据 cred 指针相对于 task_struct 结构体的偏移计算得出 cred 指针存储的地址

common

comm 用来标记可执行文件的名字,位于进程的 task_struct 结构体中。我们可以发现 comm 其实在 cred 指针的正下方,所以我们也可以先定位 comm ,然后定位 cred 指针的地址。

1
2
3
4
5
6
7
8
9
10
11
12
13
14
15
16
17
18
19
20
21
22
23
24
    /* Process credentials: */

/* Tracer's credentials at attach: */
const struct cred __rcu *ptracer_cred;

/* Objective and real subjective task credentials (COW): */
const struct cred __rcu *real_cred;

/* Effective (overridable) subjective task credentials (COW): */
const struct cred __rcu *cred;

#ifdef CONFIG_KEYS
/* Cached requested key. */
struct key *cached_requested_key;
#endif

/*
* executable name, excluding path.
*
* - normally initialized setup_new_exec()
* - access it with [gs]et_task_comm()
* - lock it with task_lock()
*/
char comm[TASK_COMM_LEN];

然而,在进程名字并不特殊的情况下,内核中可能会有多个同样的字符串,这会影响搜索的正确性与效率。因此,我们可以使用 prctl 设置进程的 comm 为一个特殊的字符串,然后再开始定位 comm。

修改

在具体修改时,我们可以使用如下的两种方式

  • 修改 cred 指针为内核镜像中已有的 init_cred 的地址。这种方法适合于我们能够直接修改 cred 指针以及知道 init_cred 地址的情况。
  • 伪造一个 cred,然后修改 cred 指针指向该地址即可。这种方式比较麻烦,一般并不使用。
间接定位
commit_creds(&init_cred)

commit_creds() 函数被用以将一个新的 cred 设为当前进程 task_struct 的 real_cred 与 cred 字段,因此若是我们能够劫持内核执行流调用该函数并传入一个具有 root 权限的 cred,则能直接完成对当前进程的提权工作:

1
2
3
4
5
6
7
8
int commit_creds(struct cred *new)
{
struct task_struct *task = current;//内核宏,用以从 percpu 段获取当前进程的 PCB
const struct cred *old = task->real_cred;

//...
rcu_assign_pointer(task->real_cred, new);
rcu_assign_pointer(task->cred, new);

在内核初始化过程当中会以 root 权限启动 init 进程,其 cred 结构体为静态定义init_cred,由此不难想到的是我们可以通过 commit_creds(&init_cred) 来完成提权的工作

1
2
3
4
5
6
7
8
9
10
11
12
13
14
15
16
17
18
19
20
21
22
23
24
25
26
27
/*
* The initial credentials for the initial task
*/
struct cred init_cred = {
.usage = ATOMIC_INIT(4),
#ifdef CONFIG_DEBUG_CREDENTIALS
.subscribers = ATOMIC_INIT(2),
.magic = CRED_MAGIC,
#endif
.uid = GLOBAL_ROOT_UID,
.gid = GLOBAL_ROOT_GID,
.suid = GLOBAL_ROOT_UID,
.sgid = GLOBAL_ROOT_GID,
.euid = GLOBAL_ROOT_UID,
.egid = GLOBAL_ROOT_GID,
.fsuid = GLOBAL_ROOT_UID,
.fsgid = GLOBAL_ROOT_GID,
.securebits = SECUREBITS_DEFAULT,
.cap_inheritable = CAP_EMPTY_SET,
.cap_permitted = CAP_FULL_SET,
.cap_effective = CAP_FULL_SET,
.cap_bset = CAP_FULL_SET,
.user = INIT_USER,
.user_ns = &init_user_ns,
.group_info = &init_groups,
.ucounts = &init_ucounts,
};
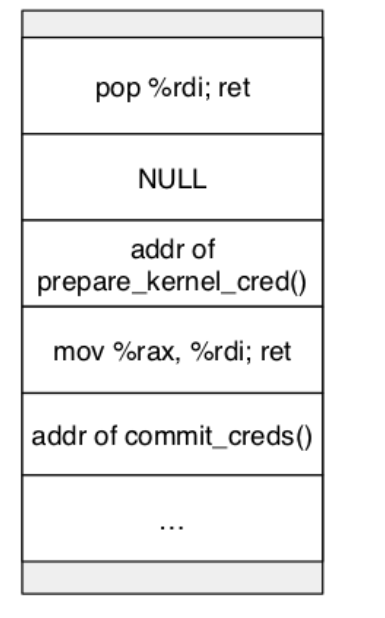
(已过时) commit_creds(prepare_kernel_cred(0))

在内核当中提供了 prepare_kernel_cred() 函数用以拷贝指定进程的 cred 结构体,当我们传入的参数为 NULL 时,该函数会拷贝 init_cred 并返回一个有着 root 权限的 cred:

1
2
3
4
5
6
7
8
9
10
11
12
13
14
15
struct cred *prepare_kernel_cred(struct task_struct *daemon)
{
const struct cred *old;
struct cred *new;

new = kmem_cache_alloc(cred_jar, GFP_KERNEL);
if (!new)
return NULL;

kdebug("prepare_kernel_cred() alloc %p", new);

if (daemon)
old = get_task_cred(daemon);
else
old = get_cred(&init_cred);

我们不难想到的是若是我们可以在内核空间中调用 commit_creds(prepare_kernel_cred(NULL)),则也能直接完成提权的工作

image-20240418105312573

不过自从内核版本 6.2 起,prepare_kernel_cred(NULL)不再拷贝 init_cred,而是将其视为一个运行时错误并返回 NULL,这使得这种提权方法无法再应用于 6.2 及更高版本的内核:

1
2
3
4
5
6
7
8
9
10
11
struct cred *prepare_kernel_cred(struct task_struct *daemon)
{
const struct cred *old;
struct cred *new;

if (WARN_ON_ONCE(!daemon))
return NULL;

new = kmem_cache_alloc(cred_jar, GFP_KERNEL);
if (!new)
return NULL;

Change Others

如果我们可以改变特权进程的执行轨迹,也可以实现提权。这里我们从以下角度来考虑如何改变特权进程的执行轨迹。

  • 改数据
  • 改代码

改数据

这里给出几种通过改变特权进程使用的数据来进行提权的方法。

符号链接

如果一个 root 权限的进程会执行一个符号链接的程序,并且该符号链接或者符号链接指向的程序可以由攻击者控制,攻击者就可以实现提权。

call_usermodehelper

call_usermodehelper 是一种内核线程执行用户态应用的方式,并且启动的进程具有 root 权限。因此,如果我们能够控制具体要执行的应用,那就可以实现提权。在内核中,call_usermodehelper 具体要执行的应用往往是由某个变量指定的,因此我们只需要想办法修改掉这个变量即可。不难看出,这是一种典型的数据流攻击方法。一般常用的主要有以下几种方式。

修改 modprobe_path

修改 modprobe_path 实现提权的基本流程如下

  1. 获取 modprobe_path 的地址。

  2. 修改 modprobe_path 为指定的程序。

  3. 触发执行call_modprobe,从而实现提权 。这里我们可以利用以下几种方式来触发

    • 执行一个非法的可执行文件。非法的可执行文件需要满足相应的要求(参考 call_usermodehelper 部分的介绍)。

    • 使用未知协议来触发。

这里我们也给出使用 modprobe_path 的模板。

1
2
3
4
5
6
7
8
9
10
11
12
13
// step 1. modify modprobe_path to the target value

// step 2. create related file
system("echo -ne '#!/bin/sh\n/bin/cp /flag /home/pwn/flag\n/bin/chmod 777 /home/pwn/flag\ncat flag' > /home/pwn/catflag.sh");
system("chmod +x /home/pwn/catflag.sh");

// step 3. trigger it using unknown executable
system("echo -ne '\\xff\\xff\\xff\\xff' > /home/pwn/dummy");
system("chmod +x /home/pwn/dummy");
system("/home/pwn/dummy");

// step 3. trigger it using unknown protocol
socket(AF_INET,SOCK_STREAM,132);

在这个过程中,我们着重关注下如何定位 modprobe_path。

直接定位

由于 modprobe_path 的取值是确定的,所以我们可以直接扫描内存,寻找对应的字符串。这需要我们具有扫描内存的能力。

间接定位

考虑到 modprobe_path 相对于内核基地址的偏移是固定的,我们可以先获取到内核的基地址,然后根据相对偏移来得到 modprobe_path 的地址。

修改 poweroff_cmd
  1. 修改 poweroff_cmd 为指定的程序。
  2. 劫持控制流执行 __orderly_poweroff

关于如何定位 poweroff_cmd,我们可以采用类似于定位 modprobe_path 的方法。

改代码

在程序运行时,如果我们可以修改 root 权限进程执行的代码,那其实我们也可以实现提权。

修改 vDSO 代码

内核中 vDSO 的代码会被映射到所有的用户态进程中。如果有一个高特权的进程会周期性地调用 vDSO 中的函数,那我们可以考虑把 vDSO 中相应的函数修改为特定的 shellcode。当高权限的进程执行相应的代码时,我们就可以进行提权。

在早期的时候,Linux 中的 vDSO 是可写的,考虑到这样的风险,Kees Cook 提出引入 post-init read-only 的数据,即将那些初始化后不再被写的数据标记为只读,来防御这样的利用。

在引入之前,vDSO 对应的 raw_data 只是标记了对齐属性。

1
2
3
4
5
6
7
8
fprintf(outfile, "/* AUTOMATICALLY GENERATED -- DO NOT EDIT */\n\n");
fprintf(outfile, "#include <linux/linkage.h>\n");
fprintf(outfile, "#include <asm/page_types.h>\n");
fprintf(outfile, "#include <asm/vdso.h>\n");
fprintf(outfile, "\n");
fprintf(outfile,
"static unsigned char raw_data[%lu] __page_aligned_data = {",
mapping_size);

引入之后,vDSO 对应的 raw_data 则被标记为了初始化后只读。

1
2
3
4
5
6
7
8
fprintf(outfile, "/* AUTOMATICALLY GENERATED -- DO NOT EDIT */\n\n");
fprintf(outfile, "#include <linux/linkage.h>\n");
fprintf(outfile, "#include <asm/page_types.h>\n");
fprintf(outfile, "#include <asm/vdso.h>\n");
fprintf(outfile, "\n");
fprintf(outfile,
"static unsigned char raw_data[%lu] __ro_after_init __aligned(PAGE_SIZE) = {",
mapping_size);

通过修改 vDSO 进行提权的基本方式如下

  • 定位 vDSO
  • 修改 vDSO 的特定函数为指定的 shellcode
  • 等待触发执行 shellcode

这里我们着重关注下如何定位 vDSO。

ida 里定位

这里我们介绍一下如何在 vmlinux 中找到 vDSO 的位置。

在 ida 里定位 init_vdso 函数的地址

1
2
3
4
5
6
7
8
9
10
__int64 init_vdso()
{
init_vdso_image(&vdso_image_64 + 0x20000000);
init_vdso_image(&vdso_image_x32 + 0x20000000);
cpu_maps_update_begin();
on_each_cpu((char *)startup_64 + 0x100003EA0LL, 0LL, 1LL);
_register_cpu_notifier(&sdata + 536882764);
cpu_maps_update_done();
return 0LL;
}

可以看到 vdso_image_64vdso_image_x32。以vdso_image_64 为例,点到该变量的地址

1
2
3
.rodata:FFFFFFFF81A01300                 public vdso_image_64
.rodata:FFFFFFFF81A01300 vdso_image_64 dq offset raw_data ; DATA XREF: arch_setup_additional_pages+18↑o
.rodata:FFFFFFFF81A01300 ; init_vdso+1↓o

点击 raw_data 即可知道 64 位 vDSO 在内核镜像中的地址,可以看到,vDSO 确实是以页对齐的。

1
2
3
4
.data:FFFFFFFF81E04000 raw_data        db  7Fh ;              ; DATA XREF: .rodata:vdso_image_64↑o
.data:FFFFFFFF81E04001 db 45h ; E
.data:FFFFFFFF81E04002 db 4Ch ; L
.data:FFFFFFFF81E04003 db 46h ; F

从最后的符号来看,我们也可以直接使用 raw_data 来寻找 vDSO。

内存中定位

直接定位

vDSO 其实是一个 ELF 文件,具有 ELF 文件头。同时,vDSO 中特定位置存储着导出函数的字符串。因此我们可以根据这两个特征来扫描内存,定位 vDSO 的位置。

间接定位

考虑到 vDSO 相对于内核基地址的偏移是固定的,我们可以先获取到内核的基地址,然后根据相对偏移来得到 vDSO 的地址。

Information Disclosure

这一点需要我们具有读取内核数据的能力。具体想要泄漏什么数据与利用场景紧密相关。

DoS

对内核进行 DoS 攻击比较容易,我们可以通过以下几种方式来实现。

  • 触发内核中的某个漏洞让内核崩溃
  • 触发内核中的死锁
  • 触发大量的内核内存泄漏,即存在大量的内存被申请但是没有被释放